
WordPress is one fantastic piece of blogging software.
Perhaps the most beautiful thing about WordPress is that we as bloggers
hold the responsibility to keep our blogs fast, safe, and secure. We
hold the power to make changes as we see fit.
A blog is a blogger’s home. And it’s our job to keep our blogs, like our homes, safe and secure. In particular, when you are running a multi-author WordPress blog, your role to ensure the security of your blog becomes even more important.
Today, I will be sharing one useful plugin called WordFence Security. It’s a WordPress security plugin which performs multiple tasks.
We’ve talked about a few WordPress security plugins to check if your blog has been hacked, and a few plugins to protect your blog from getting hacked.
Apart from plugins, you can also follow these simple WordPress security tips to improve the overall protection of your WordPress blog.
But while we’re still talking about plugins, let’s look at WordFence…
But there are many cool paid features available:
Here’s what you’ll get in the free version:
When you first download, install, and activate the WordFence security plugin from the WordPress dashboard, you will need to get an API key from their site. This is 100% free, and you can get unlimited API keys for the free account.
Once you have your WordFence API key, simply go into the WordFence settings, add your Wordfence API key, set a security level, and select the appropriate options to see the live traffic.
 I
also recommend you check out all the features offered by this
plugin and set it up according to your requirements. Once you’re done,
click on “Save Changes”.
I
also recommend you check out all the features offered by this
plugin and set it up according to your requirements. Once you’re done,
click on “Save Changes”.
Now, go to WordFence > Scan and click on “Start a WordFence Scan”.
This will run your first security scan, and it will check your existing blog for any vulnerabilities. Depending upon your site’s size, it may take hours to finish this first security scan.
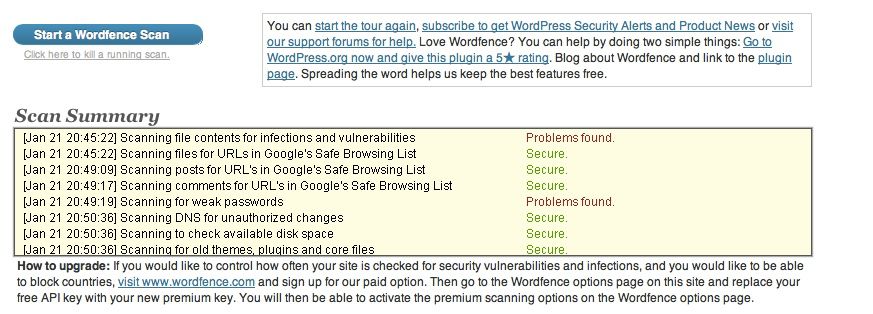 Once the scan is finished, you can see all the errors on the scan page. You can also have the results emailed to you.
I find the WordFence security plugin to be very useful. It not only scans your existing WordPress site for any vulnerabilities, but it also protects your site in real-time against hackers. Instead of using individual security plugins on your WordPress blog, I would recommend you try using WordFence.
Let me know which security plugins for WordPress you are using on your blog. Have you tried/are you using WordFence? What’s your experience? Share your reviews in the comments below!
Like this post? Don’t forget to share it!
A blog is a blogger’s home. And it’s our job to keep our blogs, like our homes, safe and secure. In particular, when you are running a multi-author WordPress blog, your role to ensure the security of your blog becomes even more important.
Today, I will be sharing one useful plugin called WordFence Security. It’s a WordPress security plugin which performs multiple tasks.
We’ve talked about a few WordPress security plugins to check if your blog has been hacked, and a few plugins to protect your blog from getting hacked.
Apart from plugins, you can also follow these simple WordPress security tips to improve the overall protection of your WordPress blog.
But while we’re still talking about plugins, let’s look at WordFence…
<script async src="//pagead2.googlesyndication.com/pagead/js/adsbygoogle.js"></script>
<ins class="adsbygoogle"
     style="display:block; text-align:center;"
     data-ad-layout="in-article"
     data-ad-format="fluid"
     data-ad-client="ca-pub-1110672488928205"
     data-ad-slot="6728373690"></ins>
<script>
     (adsbygoogle = window.adsbygoogle || []).push({});
</script>
Features of the WordFence security plugin:
WordFence is a free plugin, and it also comes with upgraded paid options. The free version, however, should handle everything just fine.But there are many cool paid features available:
- Country Blocking
- Remote Scanning
- Scheduling Scans
Here’s what you’ll get in the free version:
- Set one-click security level. With one-click security, you can set what security level you want for your site. For example, WordPress blog owners who are under heavy attack can set their one-click security level to “Critical”.
- Email alerts. Here you can set your notification options. I usually set it for a few scenarios like “Alert on critical problem”, “Alert on warnings”, and “Alert when an admin user signs in”.
- Live traffic view. This is a useful option, but I wouldn’t recommend you enable this feature for a busy site.
- Virus scanner. WordFence scanner will scan all of your existing files for any malicious code. Also, it will enable the monitoring of any newly added file.
- Firewall rules. This is useful if wish to control the access of bots on your site.
- Login security features. If you use any login security plugin, you can get rid of it! WordFence can be configured to send you notifications for any user who logs into your WordPress dashboard, and can issue lock-outs from logging in after (x) failed login attempts. Another useful feature here is it won’t reveal valid usernames in the login error.
- Additional WordPress security options. There are a few more things to do to make your WordPress blog secure. With WordFence, you can hide the WordPress version, scan comments for malicious URLs, and check password strength for your users.
- Avoid DDoS attacks. With WordFence, you can rest assured that your blog is safe from hackers.
When you first download, install, and activate the WordFence security plugin from the WordPress dashboard, you will need to get an API key from their site. This is 100% free, and you can get unlimited API keys for the free account.
Once you have your WordFence API key, simply go into the WordFence settings, add your Wordfence API key, set a security level, and select the appropriate options to see the live traffic.
Now, go to WordFence > Scan and click on “Start a WordFence Scan”.
This will run your first security scan, and it will check your existing blog for any vulnerabilities. Depending upon your site’s size, it may take hours to finish this first security scan.
I find the WordFence security plugin to be very useful. It not only scans your existing WordPress site for any vulnerabilities, but it also protects your site in real-time against hackers. Instead of using individual security plugins on your WordPress blog, I would recommend you try using WordFence.
Let me know which security plugins for WordPress you are using on your blog. Have you tried/are you using WordFence? What’s your experience? Share your reviews in the comments below!
Like this post? Don’t forget to share it!
Vivint is the greatest home security systems system service provider around. We when compared many different nothing and firms had been as specialist and helpful because the people at Vivint top 5 home security systems. These people were very respectful and specialist. Plus they really do have fantastic items at wonderful charges that also help. We recommend Vivint to everyone that people know!
ReplyDelete