In this Multi Screen age where 1320 new mobile web user gets online in
every 60 second one cannot ignore the benefits of a mobile friendly
site, If you go through Google Analytics for your site you will find
that there is a great share of mobile users. It also depends on your
blog’s niche, if your blog is related to mobile apps, image sharing,
mobile wallpaper or anything related to mobile then there are great
chances that you will get large number of mobile audience and maximum
view will come from mobile devices.
So having a good mobile optimized website is beneficial in many aspect like-
- Mobile site loads faster than desktop site.
- Increased speed provide SEO benefits and higher search engine ranking.
- Easy to navigate and use website.
- Improved Mobile user experience.
- Better ad serving.
Creating a mobile friendly site is easy for WordPress, you just need to install WPtouch Mobile Plugin,
however there are many plugins are available but WPtouch is the most
used plugin to create such site, and it is most recommended plugin for
mobile site.
Alright just go and
install this plugin and you have to do simple settings, since there
are two version of this plugin is available free and Pro. You need to
install free one where few features are locked like extra themes,
web-app mode and Advertising, you can get these features in pro version.
ShoutMeLoud is currently using WPTouch pro plugin. Grab your license of
WPTouch pro from here.
For bloggers like you and me the Main feature which is required is Advertising
which is locked in free version however you will get every ads on
mobile site which are in blog post but what about the other ad unit like
header ads, sidebar ad or ads below the post ? Even if you upgrades to
pro version you will get ads only in header section.
How to Monetize WPtouch Enabled Blogs.
I
assume that you have installed the WPtouch mobile plugin from you
dashboard and did the required setting and customization according to
your choice, it contain only one mobile theme Bauhaus which is attractive in look and style, rest other themes in pro version are mainly used when you have a organisation’s website. The major focus here is to put ad codes in Wptouch theme.
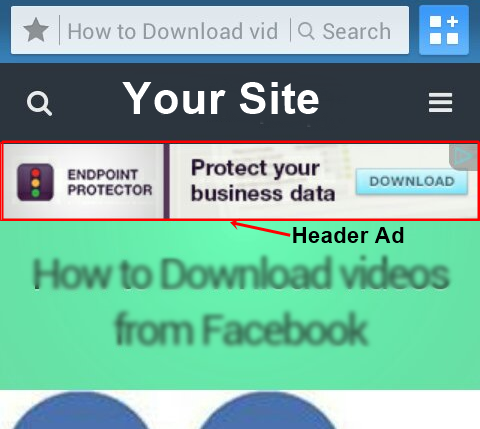
1. How to Inject ad code in Header of your blog.

Having
an ad unit below the navigation bar in header area is always fruitful,
since header ads are the first noticeable spot and there are greater
chances to get click, nowadays nearly every smart phone has touch based
navigation system, so keeping ad unit below Menu button can give extra
click to ad unit.
Follow these steps to put ad into header :-
1. First you need to get access to your site back-end from any FTP client like FileZilla, Login to FileZilla using your FTP Credential.
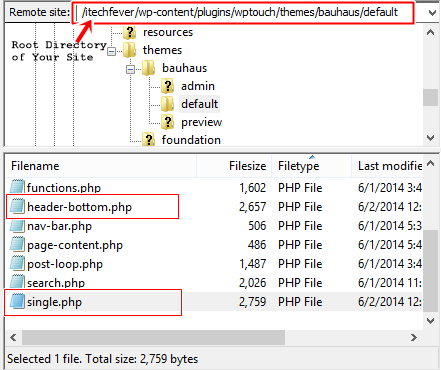
2. Navigate to your site folder and follow this path –
Site’s root directory/wp-content/plugins/wptouch/themes/bauhaus/default as shown in the image below.
Here you will get few php files you need to download header-bottom.php and single.php on your desktop.
3. First open header-bottom.php using any text editor like Notepad or Notepad ++.
4. Now you need to get Adsense
code from your Adsense account, so which type of ad unit you are going
to put in header? Is it going to be Leaderboard, Mobile banner,
rectangle or any other banner? You are going to put ads in smaller
screen where large banner will not show properly, and rectangle will
look ugly in header.
So here is a
better ad unit is available in Adsense which changes its height and
width on different mobile devices and serve ads based on screen size and
orientation ( Portrait and Landscape ) this is know as Responsive Ad Unit which is still in beta phase. So it is recommended to create a Responsive ad unit and get the Javascript code.
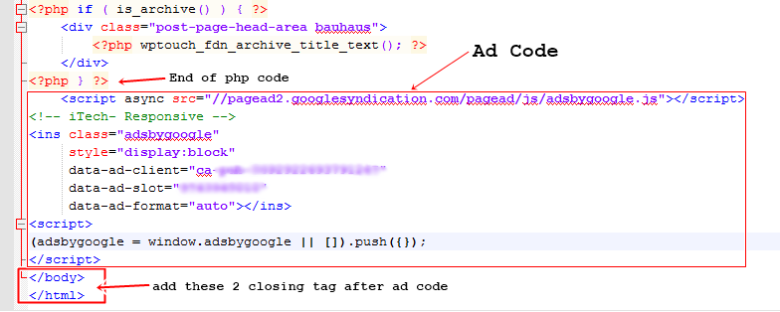
5. Now paste this Ad code in header-bottom.php file at the end of php code, see the image below.

after pasting the ad code at the end of closing PHP tag you need to add two extra line of code and in separate lines.
Save the file and do not rename it.
2. How to Enable Google Custom Search in header.

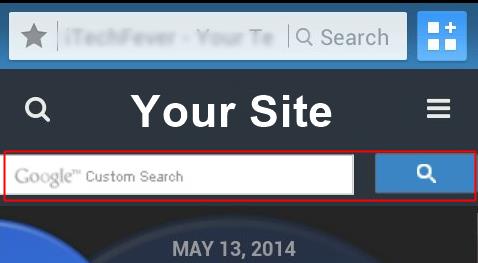
By
default there is a tradition WordPress search box is present in the
header of bauhaus theme, which is a search dropper, prompt for search
box when user touches the search icon. We are going to replace it with
Google Custom Search box. Follow these steps to customize search box-
1. Get you JavaScript code ready for Google Custom Search,
if your search box shows search result in new tab then wait, since
mobile browsers are different from desktop browser where an auto pop-up
or new tab is not easily noticeable which can distract users, so it is
advisable that create a new Custom Search where it can show the result
in same page.
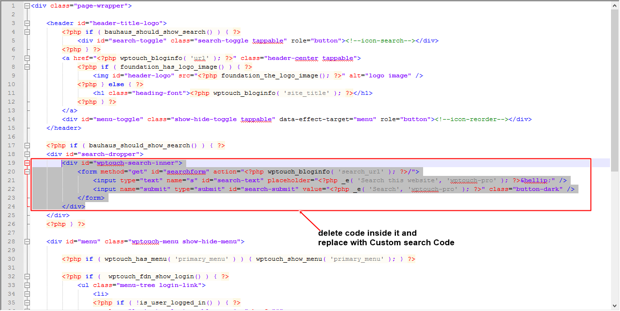
2. Once again open header-bottom.php file, and find the code <div id=”search-dropper“> and delete code which is inside this division tag, lets elaborate using image- (click on image to enlarge)

As you see in above image you need to replace the highlighted code by Google Custom Search code. Save header-bottom.php file .
Seems confusing ? One can also get the modified header-bottom.php file here
where you only need to put your ad codes (Both responsive ad &
Custom search) in mentioned area, just copy this code paste into notepad
++, put you ad codes in mentioned areas and save file as header-bottom.php
3. How to insert Ad code below the blog post.
There
is option in WPtouch plugin where you can put any ad code which will
execute in footer, this option is available in theme setting for WPtouch
in WordPress dashboard.
But having a Ad unit in footer is not a good practice, so if you want to put ad unit below the post then follow these steps :-
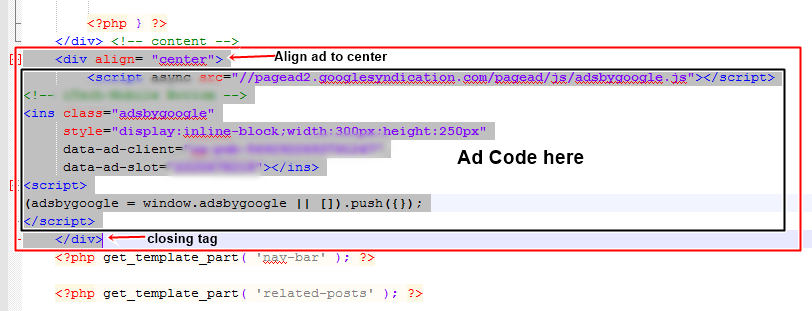
1. Open single.php file using text editor, find the PHP code <?php get_template_part( ‘nav-bar’ ); ?>
and paste your ad code above it, You can put Responsive ad unit,
rectangle or mobile banner here, this ad will show below the post but in
left, to align this ad into center you need to add your ad code within
center align tag as-
<div align= “center”>
Your ad code here.
</div>
and at the last of php code add two more tag and in separate lines.
As in above image you can see that ad is inserted above <?php get_template_part( ‘nav-bar’ ); ?> within center align tag.
Again the modified php code is available here, copy and paste it to notepad++, put your ad code in mentioned area and save file as single.php
After saving both header-bottom.php and single.php file on your computer go to FileZilla and delete these two files from server and upload the modified files, once it is uploaded on server you will get your ads running on mobile site.
So here you will get following ad units in your blog-
- Header Ad (Below navigation bar)
- Google Custom search
- Ads within blog post [ Both in desktop and Mobile version]
- Ad below blog post.
If
your blog does not serve any Adsense ad in desktop version like
ShoutMeLoud but you want to show in mobile version then follow all above
steps plus you also need to inject ad within blog posts which you can do by putting the ad codes in page-content.php , I am skipping this part because most of you have ads enabled in blog post.
Since
this mobile theme is modified by myself you won’t find any such method
over internet, If you want to review first before implementing in your
site then you need to visit my Site on mobile device. Although my blog
is quite new i have noticed increased CTR form mobile devices. Also if
you get new updates for WPtouch do not update soon until it offers major
changes, after an update you may need to perform above steps again.
Feel free to comment if you face any problem during this process.
If
you are monetising your mobile friendly WordPress blog with any other
method, do let me know via comments. If you are an existing WPTouch user
and found this tutorial useful, do give us a vote on Google plus and
Facebook.
This useful mobile monetisation post is by Sandeep. If you would like to submit an original post on ShoutMeLoud, check our submission guidelines.

0 Comments:
Post a Comment